
Content:
- Modifying the DJT - Flashing the radio with custom firmware - Telemetry screen
|
Note: I don't take any responsibility for any damage you may cause to any of your equipment. Do anything at your own risk. All the mods shown here I have done on my radio and other equipment and I do confirm that everything works great as it should. So if you do everything as described here, everything should work for you too ;) I have collected all this information from internet and some of them I have done myself, so I would like to thank all the contributors and authors of this great community for keeping this hobby in great stand.
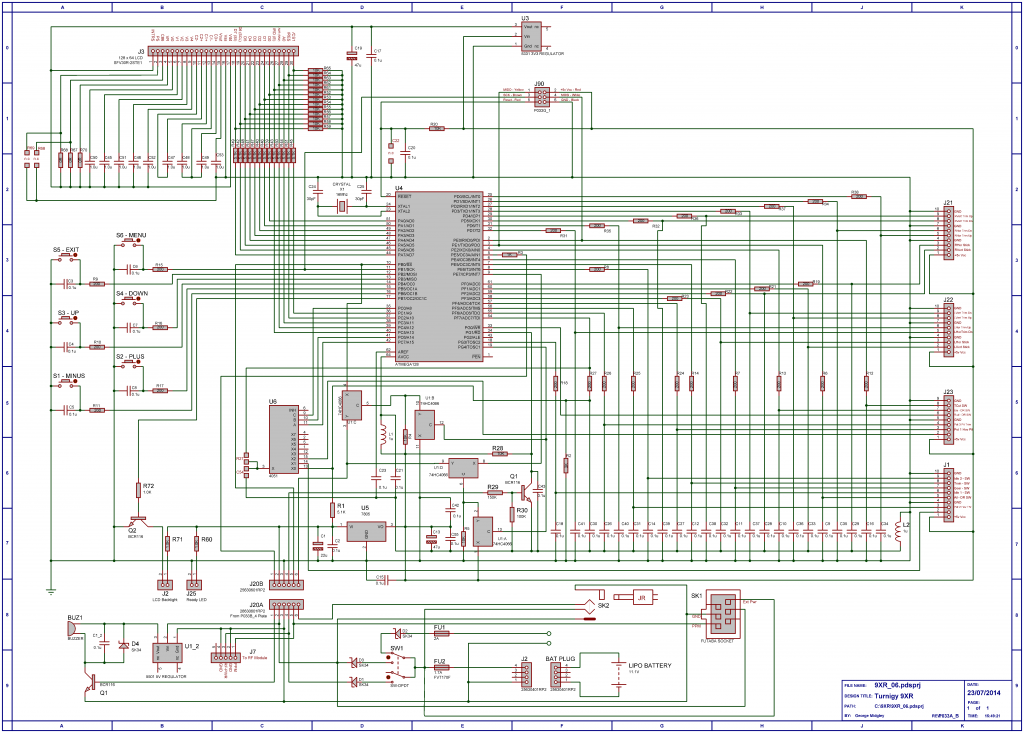
Turnigy 9XR + DF combo for JR Telemetry mod
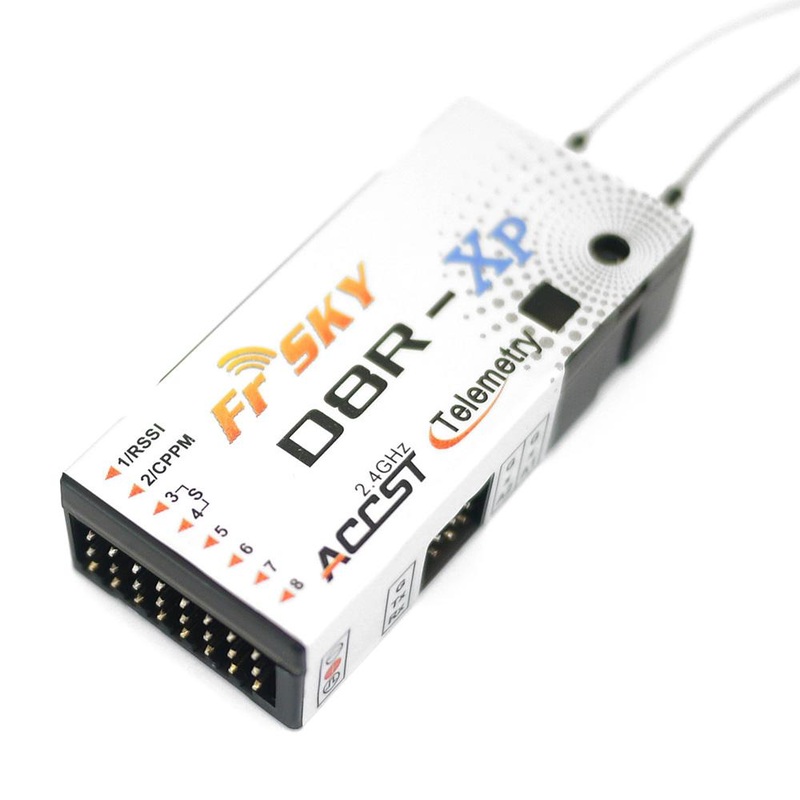
Turnigy 9XR is a great radio and it is the successor of the very popular Turnigy 9X which is still widely used among the hobbyists. However there are some changes made to the Turnigy 9XR which have made this radio even better in my opinion even though there are some issues that need to be considered, but comparing everything to the price, it is a wonderful radio with a lot of capabilities. Turnigy 9XR is sold without any module, so it depends on you what module and frequency you would like to choose. However there is one module which is widely used by the RC community with great results and this is the FrSky DJT module which combined with a capable receiver gives us a two way telemetry system which means we will be able to receive telemetry data from the plane such as battery status, velocity, altitude, GPS coordinates if equipped with a GPS unit etc. to our 9XR radio and see them on the screen. This is actually a great feature which gives us more control over the aircraft. There is system called DF combo for JR which includes the FrSky DJT transmitter module for JR (JR is the connection type of the module, and they must match with the radio, if the radio is not JR compatible than the JR module doesn't fit so you must be careful while choosing the system) and a telemetry capable receiver called FrSky D8R-II Plus.

Modifying the Radio
Actually there are two ways to get the telemetry data on the screen. The first one is to capture the signals before they get converted, and the second way is to convert RS232 levels to TTL ones using a Mini RS232 to TTL converter. I'm going to describe the first method, maybe in the future I will describe the second one too.
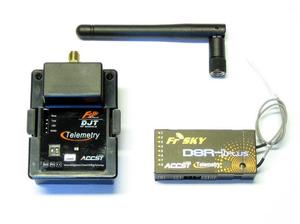
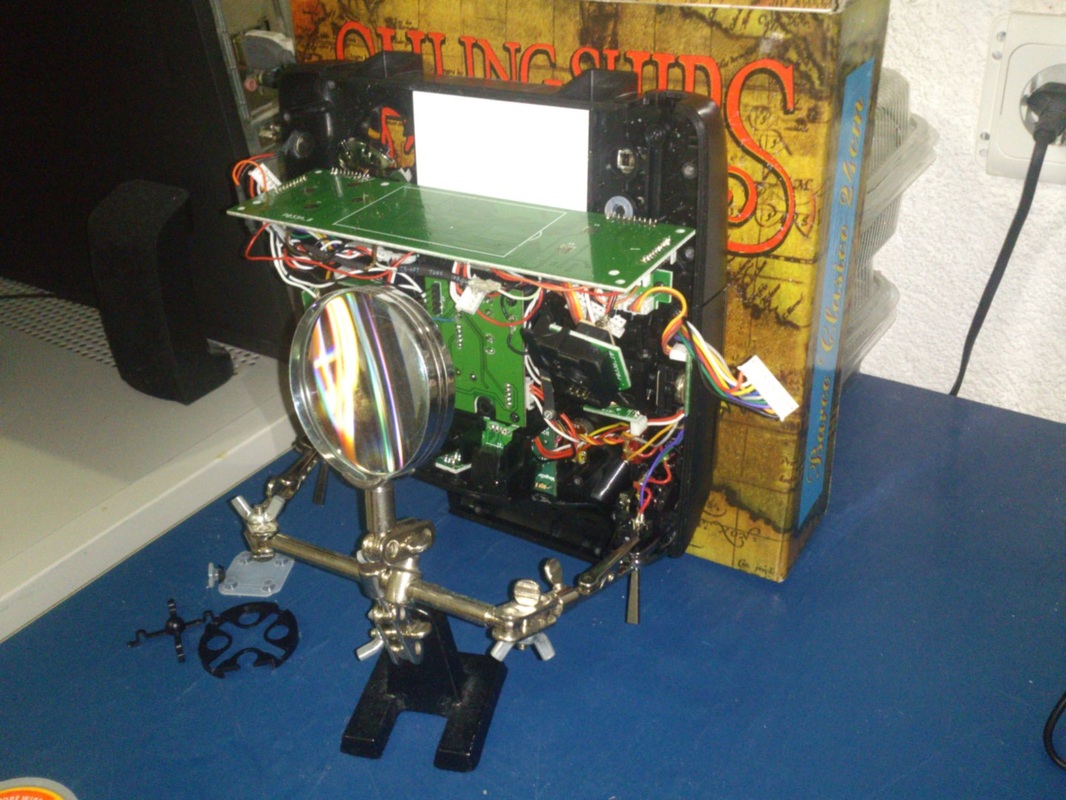
First of all remove the battery and open the radio by unscrewing it, there are 10 screws on the back of the radio. After you open the case, you also need to unscrew the RF board.
First of all remove the battery and open the radio by unscrewing it, there are 10 screws on the back of the radio. After you open the case, you also need to unscrew the RF board.
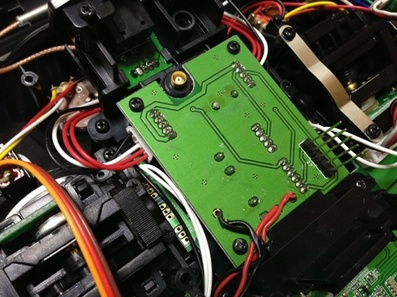
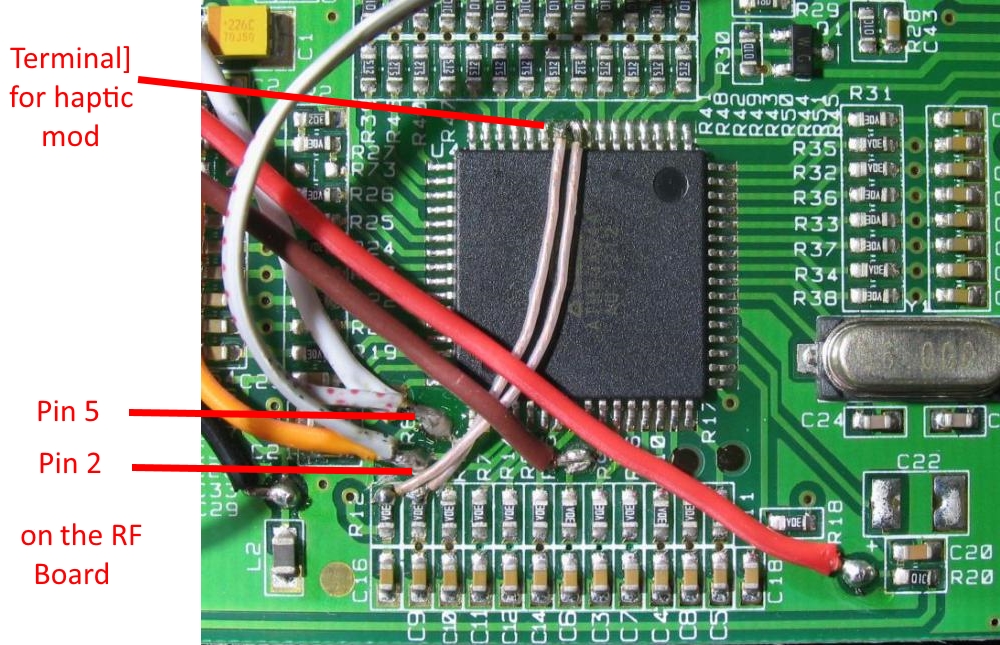
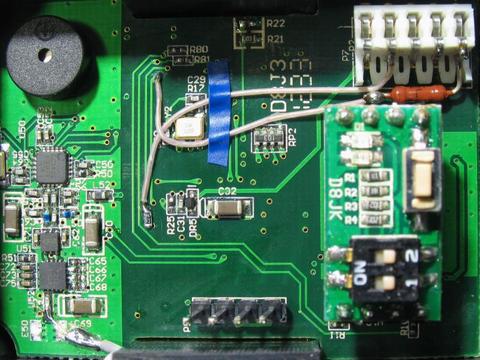
Locate 5 pins on the RF board and carefully lift the plastic spacers so you have place to work on the pins. locate the pin 2 as shown in the picture and cut the ground on both sides with a sharp knife. You have to cut the ground completely or the mod won't work. Most of unsuccessful mods occur because the ground on pin 2 was not cut completely. The best way to check it is the use of a multimeter.
After confirming that the ground has been disconnected from pin 2, turn around the board and locate the pin 2 on the other side. Go ahead and do the same here as well. Cut the traces around the pin and check with a multimeter again to be sure there is no connection between ground and pin 2.
Once done, take two wires with and cut them in a length of approximately 13 cm . It is a good idea to have them in different colors, if not then mark them or test them with a multimeter. Solder them on pin 2 and pin 5 of the RF board and put it back in place. You are done with this part.
Now here comes the most difficult part. You need to be very good at soldering, if not than just leave it to a professional. There are very tiny processor legs you need to solder to. It is a good idea to order a spare mainboard just in case since it is very cheap (about $6). However If you still want to do it your self, i think you are brave :).
|
|
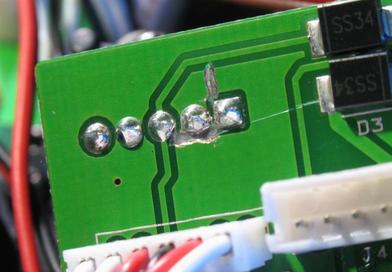
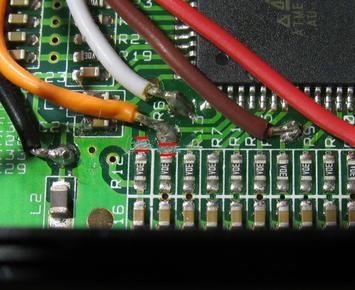
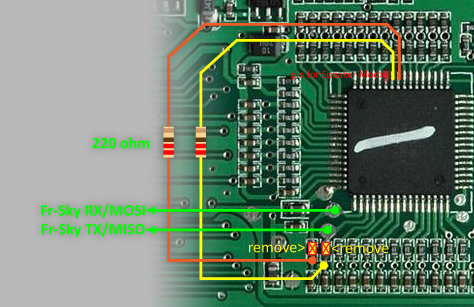
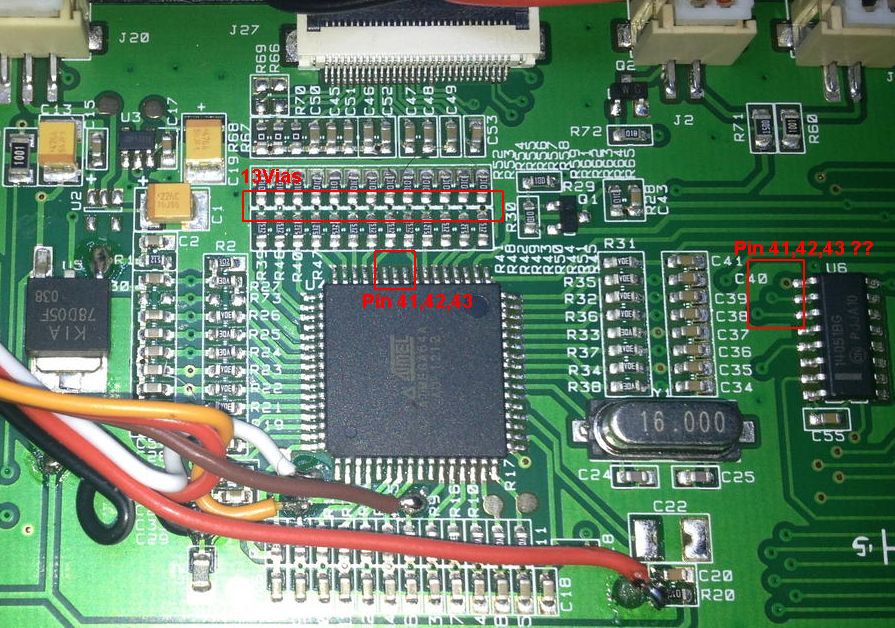
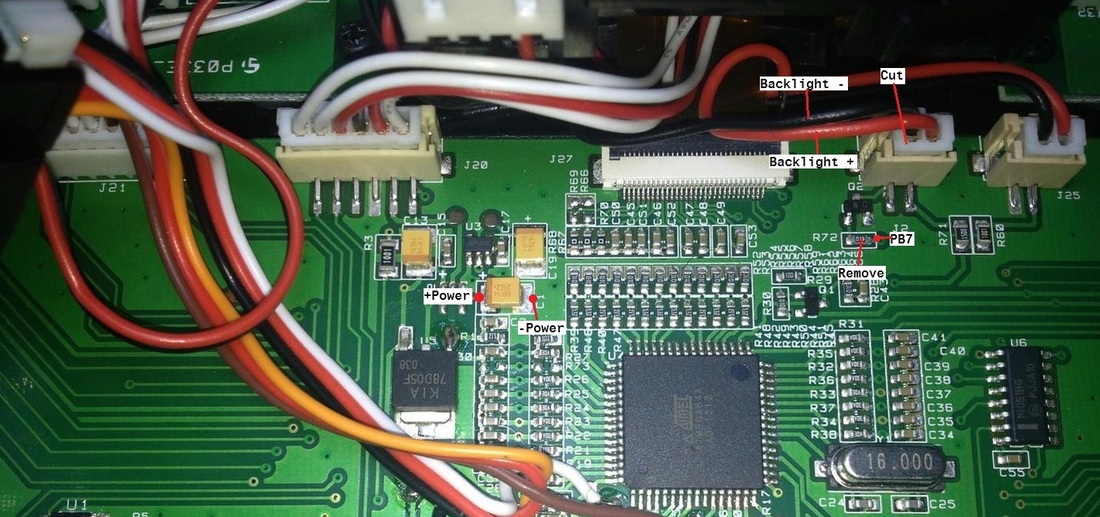
To be able to have telemetry on the screen of radio, we need to route the THR and AIL switches to terminals 41 and 42 of the Atmega micro controller, Thee are two ways to do that. The first one is to cut the traces right above the SMD resistors with a sharp knife like in the first picture and then solder two wires from the two resistors to the micro controller terminals. This way we use the existing resistors and don't need external ones ( be advised that the wire from first resistor goes to terminal 42 and the wire from the second resistor goes to terminal 41). The other way is to completely remove the two SMD resistors like in the picture and use external ones to connect to the micro controller terminals. In case you prefer method two, you need to buy two 220 ohm resistors. Which method you use it's up to you, If you think that the micro controller pins are too small for you to solder to than you maybe it is easier for you to solder them to an alternative place like in the picture below.

|
|
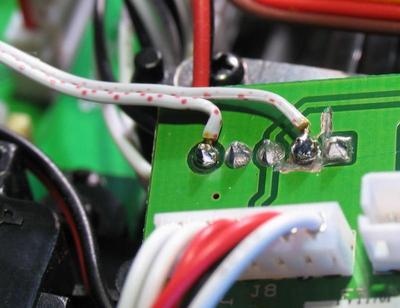
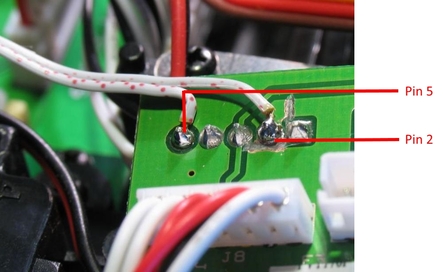
If you plan later on doing the haptic mod, it is a good idea to solder a wire to the terminal marked in the picture below. If you think you have already lost enough weight doing this, than maybe another time :). Once you solder the wires from the resistors to the terminals of the Atmega chip, there is one more job you need to do on the radio. You need to solder the wires you previously soldered on the RF board on the MISO and MOSI ports on the main board.
|
|
As illustrated in the picture above, solder the wire that comes from pin 5 of the RF board to the upper (white) wire and the wire that comes from the pin number to to the bottom (yellow) one. It is a good idea to solder a 500 ohm resistor between pin 5 on the RF module and pin 5 on the main board. This concludes the mod on the Turnigy 9XR radio. Put everything back together and you are done with the hardware part of the radio. If you still have the stock firmware of the radio after you turn it on, you will notice that everything will work except for the THR and AIL switches. Don't worry, it is normal, you will get them back after flashing the radio with a custom firmware but we will do that later, let's just keep soldering and finish the hardware mods first :).
Modifying the DJT
Let's continue with the mod on the DJT module. Unscrew the module and open the back of the case but be careful with the antenna cable. I would suggest you disconnect the antenna from the PCB board, you just have to pull it and it will come off. Once you have done that, take out the PCB board .
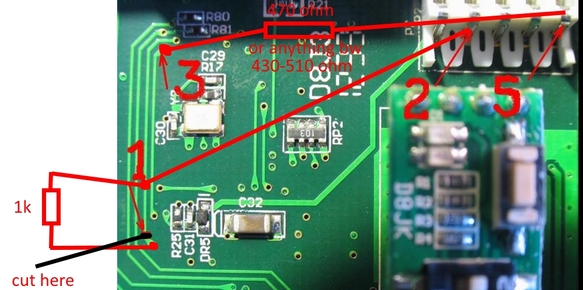
The PCB will look like the picture above . First you need to cut the trace at the number 1 creating a gap. Than with a sharp knife you need to scratch the places where you will solder (point 1 and 3 and also the place at the beginning of the 1k resistor, be careful not to damage the tracks). Than solder a 1 k SMD 0603 resistor there or any normal 1k resistor would work. At the same place (point 1) solder a wire and take it to Pin 2 and solder it there too. You will than need another 470 ohm resistor or if you don't have any, you can use anything between 430 - 450 ohm and using wire solder it from point 3 to point 5. You are done with the mod on the DJT
In the picture above you can see a moded DJT. It is a very clean job, even though it is very hard to do it. Even if yours doesn't look that clean, it doesn't matter as soon as it works ok :). You can put everything back in place now and close the DJT module. The mod has been done. For any reason if anything went wrong, read back and look at the pictures closely for any mistake you might have made. If you have followed the instructions step by step, everything should work fine.
The firmware
After you are finished with the hardware mods, you need to flash the radio with a custom firmware which will make the two switches THR and AIL work and also will make it possible to display the telemetry data on the screen. There are two custom firmware available: one is called ER9X and the other one is called OpenTX. Which one you should use depends on you, you can try both and then decide for your self. In this tutorial i'm going to explain the ER9X as this is the firmware I use in my radio.
|
Depending on your Operating System, choose the corresponding tutorial on how to install the drivers:
After installing the drivers you will need the following files
|
|
In the page above you will find a lot of information about this project including manuals and tutorials. Before flashing the firmware it is a good idea to remove the DJT module, even though we have protect it with the resistor in the mod. Making it a habit would be good.
- Download and install eepe
- Download and save the latest binary from the site above
- Turn off the radio
- Remove the DJT module
- Open eepe
- Connect the cable USBasp to the radio
- Connect the other end of the USBasp cable on a free USB port on your computer
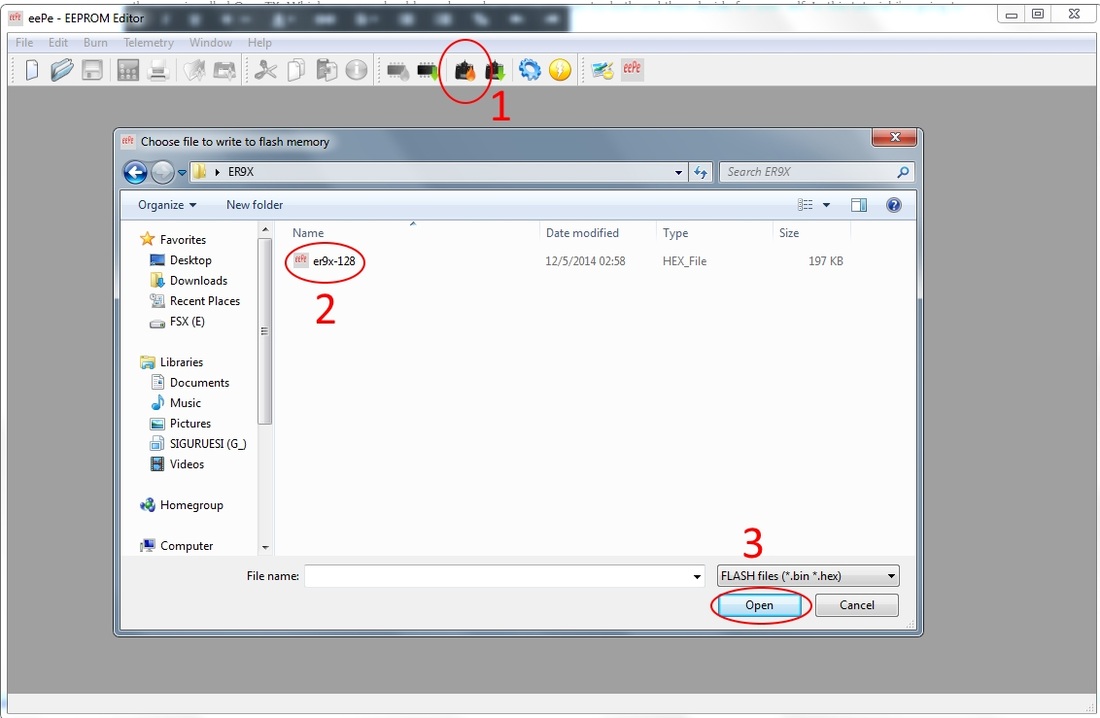
- In eepe click the button with a transmitter and a flame in front of it
- Locate the binaries you have downloaded before
- Click open
eepe will read, write and verify the written files on the radio. If everything goes well, you will get the message "Avrdude finished successfully" . So you are done with flashing. Remove the USBasp from the radio and turn the radio on. You will get a message about EEPROM data being bad or something similar, click ENT to format the EEPROM. Once it finishes, you need to go to the menu by long pressing the left button on the D-pad and then navigate to the calibration menu. Follow the instructions and calibrate the radio. Once done, navigate to the first Menu, or if you are not on the menu anymore, go back there by long pressing the left button on the D-pad. Scroll down and navigate to the option FrSky Mod Done: NO and change it to YES and that's it. You will have now the THR and AIL switches working and after configuring the telemetry options on the Telemetry page, you will also have Telemetry data showing on your screen.
Telemetry screen
|
|
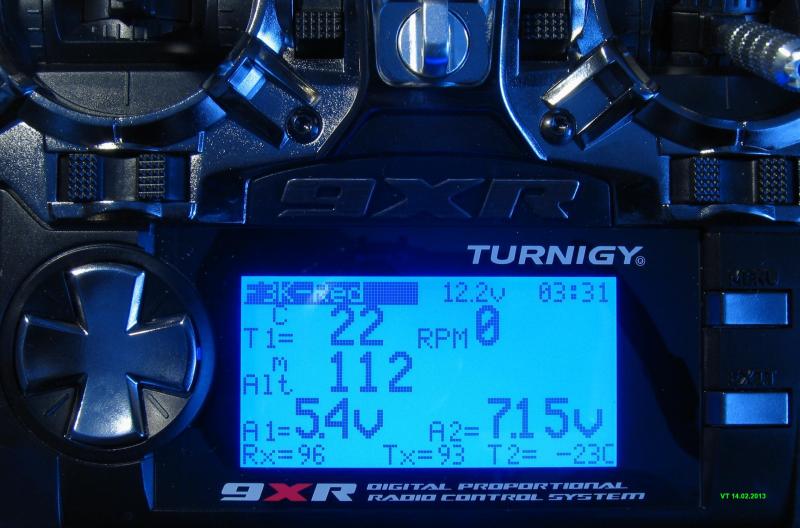
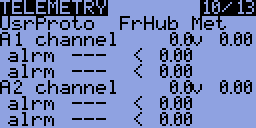
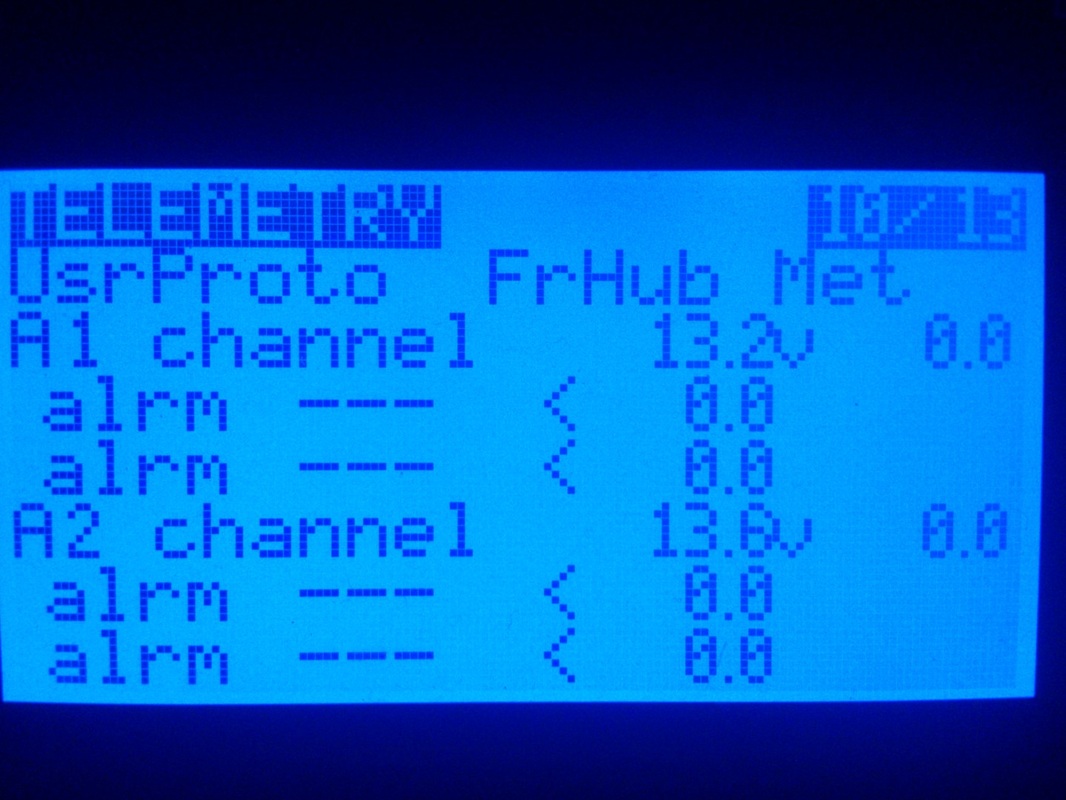
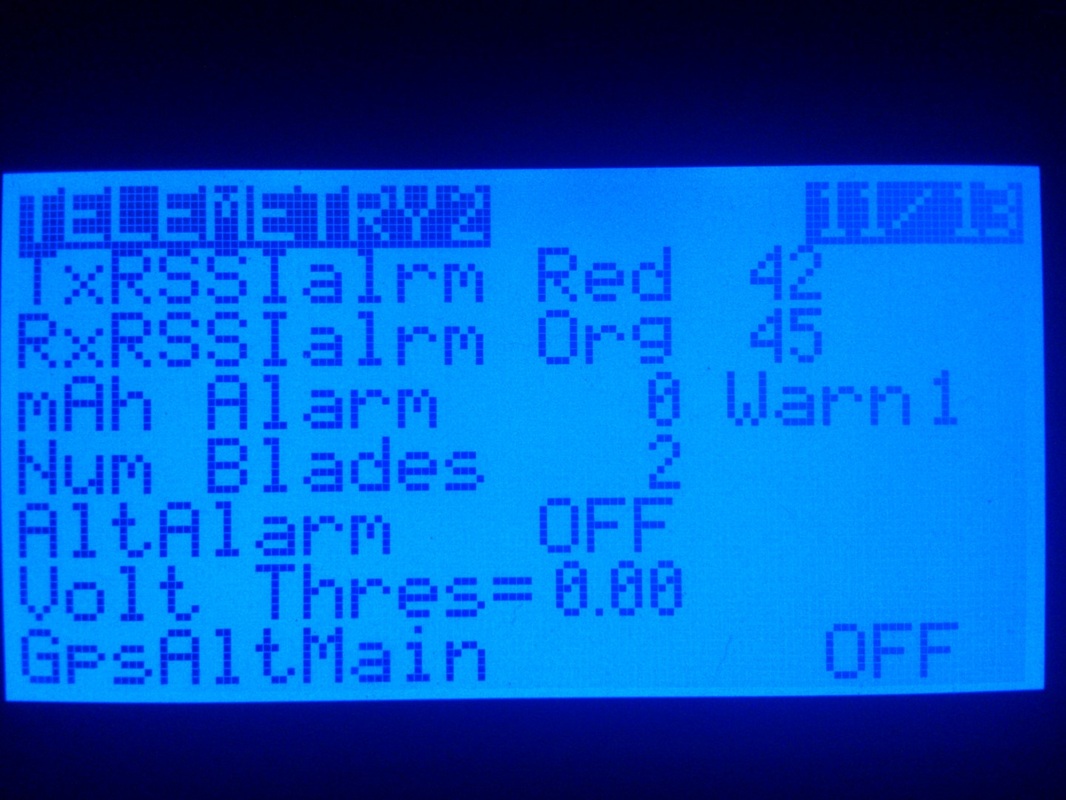
You have 2 screens for telemetry setup. On the first screen is UsrProto, which stands for User protocol. You have 2 options, if you have a Frsky hub plugged into the receiver then set this to FrHub. If you have the How High from Winged Shadow plugged into the receiver then set this to WSHhi. The second option on this line is Imp or Met. For imperial or metric displays. Next down it says A1 channel. Just to the right it will say 0.0v. This is where you set the range of your input. The range is 3.3 times your divider ratio. The built in divider ratio in Frsky receivers is 4:1. So the range is 4*3.3 = 13.2. The number further to the right displays the channel voltage from the receiver scaled by your range value. So if you have your receiver plugged in you will get a value displayed here. This also allows you to calibrate the displayed voltage. Just connect a voltmeter so you know the battery voltage you are reading and adjust the range value so it matches. Next down are the alrm(alarm) settings. You have 2 for each channel. In the first column you can set Yel, Org, or Red. This simply means to have the Frsky module beep 1, 2, or 3 times when the alarm condition is true. Set to '---' to disable the alarm. To the right you have '<' this means less than. You could change it to '>' also. Finally in the third column you can set the alarm voltage. Set this to the threshold you want the alarm to go off at.
For more info, tips and tricks, tutorials, software and latest binaries, visit:
https://code.google.com/p/er9x/
Adding slider pots to control pan and tilt on a 3-axis gimbal
DIY FrSky D8R-II Plus current sensor
|
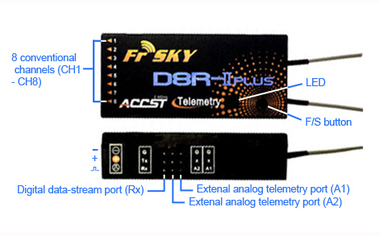
The FrSky D8R-II Plus receiver is a diversity receiver which has 8 channels, and two other ports for telemetry data. If used together with a FrSky hub, you can use more sensor to get telemetry data and send them to your radio. The good thing about this radio is that it has two ports, which you can use to read telemetry data without a FrHub. To do that you will need a sensor and attache it in one of the two available ports (A1 or A2). I don't have a FrHub, so I will use one port (A1) to monitor the internal voltage of the receiver, and the other one (A2) to monitor the voltage of the airplane's battery, which is very important while flying RC. To monitor the internal voltage of the receiver, all you have to do is to install a jumper on the A1 and x pin (it usually comes preinstalled this way so you haven't removed the jumper for any reason, you don't need to do it). This way, after setting up the right values on the radio, you will receive the internal voltage data of your receiver on your screen.
To be able to receive the voltage data of the model's battery, you can buy a voltage sensor here or anywhere else online, or you can build it yourself. |
|

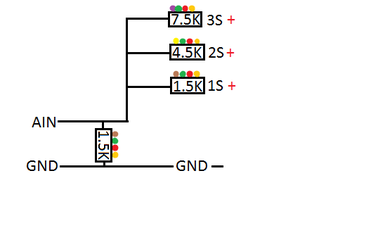
Voltage divider for 3S Battery
To build the voltage sensor for a 3S battery yourself, all you need is 1x1.5K resistor, 1x7.5K resistor, 3S balance plug (the opposite of the battery one) some wire and heat shrink tube. Solder the wires and the resistors like in the picture. If you power the receiver from the same battery, you don't need two wires to be connected to the receiver, but only one as shown in the picture, because the ground will be provided from the Battery to the ESC and then to the receiver. If you however would like to measure another battery which is not connected to the receiver, than you should connect both wires (A2 and Ground) to the receiver. To build a voltage divider for a 2S battery, instead of the 7.5K resistor, you should use a 4.5K one. To build a 1S divider, you need a 1.5K resistor instead of the 7.5K one. Be careful, don't switch positive and negative side as it may lead to damages caused to any of your components. After you have done the soldering, use heat shrink tube to cover the resistors and the soldered places and you are good to go. On the receiver side of the sensor, use a connector from a servo extension lead with only one wire leading to the A2 pin of the receiver. Once you are done with the sensor, connect everything and turn on the radio. Navigate to the Telemetry Menu and set the UsrProto to FrHub and the units to Met if you use Metric. Set A1 channel value to 13.2 and set the two alarm levels you would like to be notified when the internal voltage (voltage of the receiver) drops below the value you specify in the second column. Set the A2 value to 13.6 and again the two levels of the alarms which will notify you when the aircraft's battery drops below given value. Also in the second screen of Telemetry, set the values for TxRSSI alarm and RxRSSI alarms ( in my case 42 and 45). and you are done.
I haven't set the alarms as I'm using HKPilot Mega 2.7 Master Set which has MinimOSD and I see all the data goggles.
Here is my setup:
I haven't set the alarms as I'm using HKPilot Mega 2.7 Master Set which has MinimOSD and I see all the data goggles.
Here is my setup:
|
|
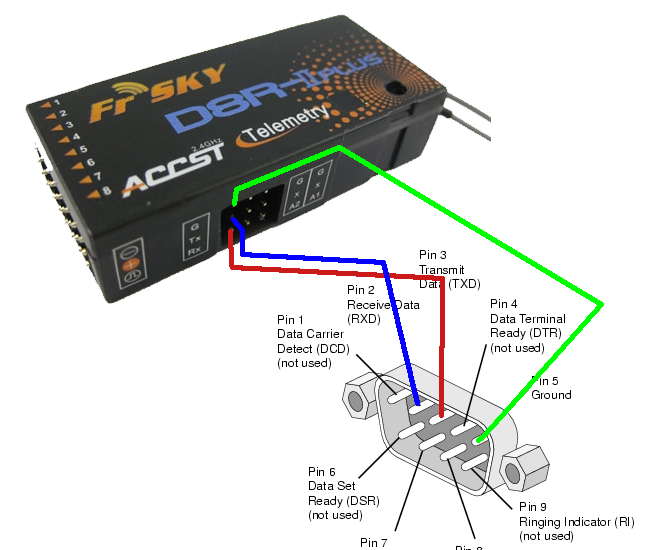
Flashing FrSky D8R-II Plus with latest D8R-XP firmware (to get CPPM and RSSI)
|
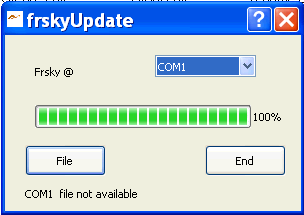
Frsky D8R-II Plus receiver doesn't CPPM and RSSI output, but since the FrSky D8R-XP has that possibility and they are both same from the schematic, we can flash the D8R-XP firmware to our D8R-II Plus and get the CPPM output on channel 1 and RSSI output on channel 2 while jumping signal pins on channel 3 and 4. There are 3 ways to do this. The first method is to use a FrSky programming cable, the second method is to use a FTDI cable and invert the RXD and TXD input/output using a program called FT Prog from FTDI Utilities, and the third method is to use a PC's serial port. I'm going to describe the third method. It is very simple.
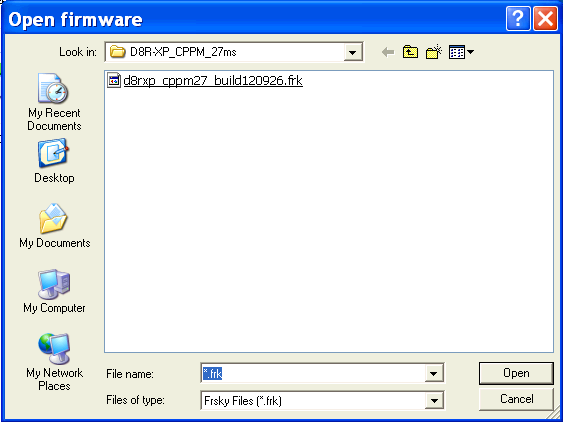
Download: FrSkyUpdate software D8R-XP firmware
|

|
|
|

|
|
Now you need to connect signal pins of channel 3 and 4 to get CPPM on channel 1 and RSSI on channel 2. Now you will have a D8R-II Plus receiver with the latest D8R-XP firmware with CPPM and RSSI output.
The Haptic mod
|
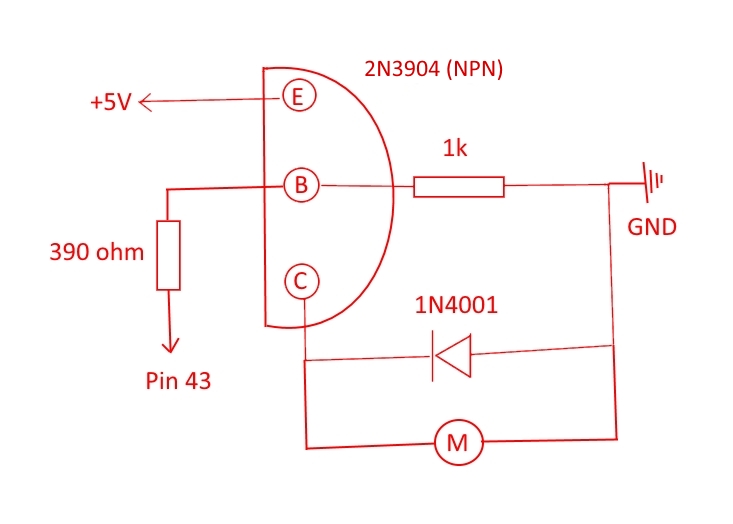
Adding haptic to your 9XR radio is not difficult except for the part where you have to solder a wire to pin 43 of the Atmega chip. It is a very difficult job and not everyone can do it. Especially if you have done the telemetry mod before. The Atmega terminals are tiny and you should use a fine soldering iron tip and also thin wires. If you think you can't do it, you better leave it to a professional. If you think you are good at soldering than go ahead and do it. In both cases I would suggest to buy a spare Turnigy 9XR mainboard ($6.25).
|

|
|
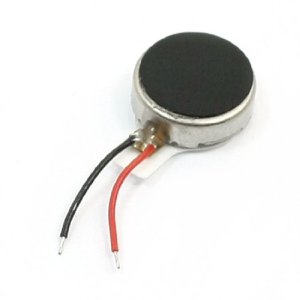
You can use a vibration motor from a cell phone and use the schematic to connect them to the main board. You can find one in an old phone (not that old that because it won't have vibration :) ) or you can purchase one online. There are two kinds that are mostly used on cell phones: the flat ones as shown in the picture on the right (I have installed this type) and the cylinder type ones. They are both same, so you can use either one of them. Another option is a toothbrush motor. It is easy, just follow the pictures. After you are done with the mod. Turn on the transmitter and navigate to Radio Setup and set the haptic strength you want.
|
|
Parts you will need:
|
|
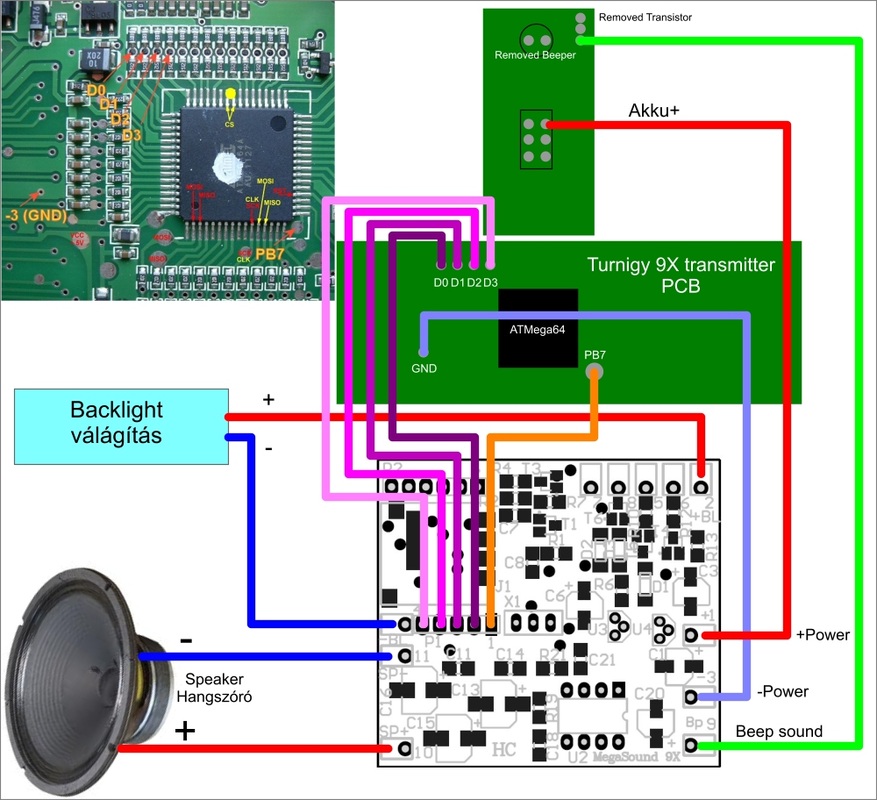
Installing Megasound9X

|
|
In the video below I have shown the Turnigy 9XR with the Megasound9X installed and the German voices made by me.
Changing the buttons
Note: Before you do this mod, you should know that pushing the buttons rapidly, the radio restarts. In order to fix this issue you need to solder some resistors between the buttons and the micro controller like described below.
|
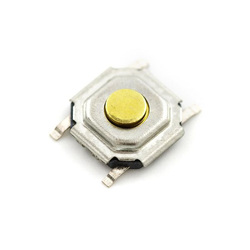
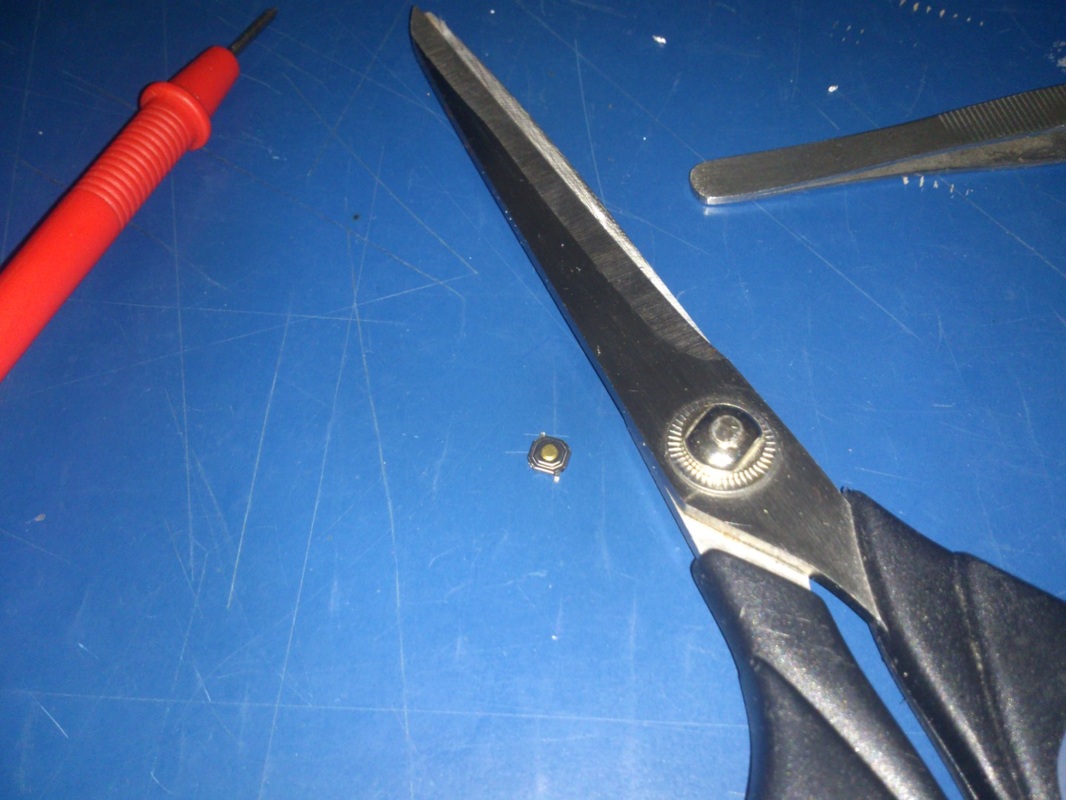
When you push the stock radio buttons, they feel too soft and you need to push hard to change menus or values. To improve the feel and the action of the buttons, you can solder some so called Tactile Push Button Switches. There are different ones, but you need those with this dimensions 4x4x1.5mm. I purchased them here (10 pc $1.18 free shipping). I did this mod after I had done all other mods, so with all the wires connected to the board, I couldn't remove the main board, so I opened the case, unscrewed the board, turned the radio upside down and used my helping hand to hold the radio that way so I could solder the buttons. Than you need to cut two diagonal legs as you can see in picture nr.4. I used scissors to cut the legs as deep as possible from the back site to avoid contact with the board. Than solder two remaining legs on the board like in the last picture. Test everything with with a multimeter. If you haven't done any mistake, put everything back in place and enjoy the new feeling of the buttons.
|
|
|
|

|
|

|
A lot of people ( including me) have had problems with the radio resetting after installing the tactile push buttons. To resolve this problem, you need to cut the tracks of the four buttons and solder 1k resistors like in the picture below. You can use either SMD or normal resistors, but first be sure the tracks are cut properly and then after installing the resistors check again with the multimeter the values between resistors and check for continuity

Attaching a monitor to the Turnigy 9XR
|
The Turnigy 9XR is a great radio, but having a monitor on top of it for FPV flying would make it even better. So after i got two sets of Quanum DIY FPV Goggles, i decided to use one of them with my Turnigy 9XR. So i purchased the stand from Hobbyking, but until it arrives it will take some time, so i thought of using the the mounting brackets of my SJ4000 camera. I needed to cut the back of the monitor flat and glue one of the mounts on it using the double sided tape that was already glued on it. Than I used three parts of the mounts to form a stand which you can move in two directions. I soldered two wires inside the radio to the power and ground of the futaba port and using a connector I power on the monitor and the receiver from radio's battery. You could also use an external battery for this purpose. 850 mah or 1000 mah would be great choice. For more watch the video
|
|
2015, Copyright AlbEAGLE
